Using the New Advanced Search
When searching for any specific information within a module of POSIM, it can be helpful to be able to search for more than one field. The following information represents a quick guide for using the Advanced Search feature in POSIM 13 and beyond. If you have further questions or need assistance with search functionality, please contact support@posim.com or call 800.553.9314 to speak with a tech support representative.
Advanced search helps the user locate cards in the POSIM database using any knowledge of the card they already have. Multiple cards with matching data can be found by cross-referencing various fields in order to generate lists of relevant information.
Open advanced search by clicking the magnifying glass symbol near a search box. Below are a few examples of where the advanced search buttons are in POSIM.
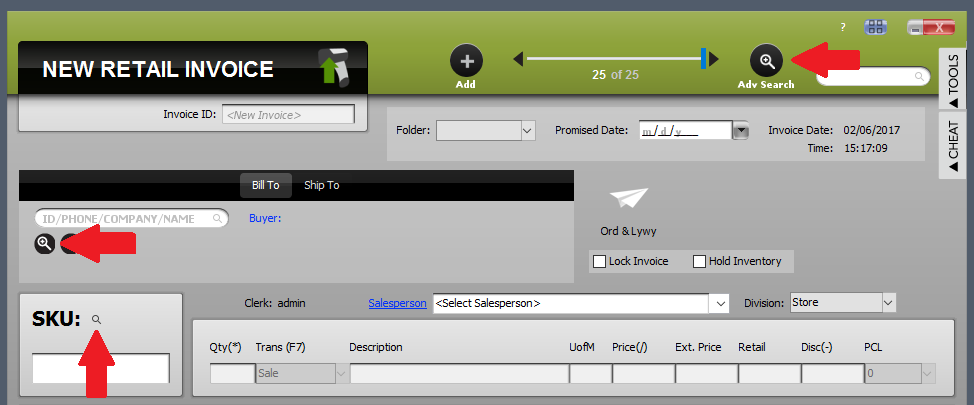
The Advanced Search buttons on an Invoice
Each of the columns used in the advanced search is separated vertically into “From” and “To” sections. Typing into one of those sections will narrow the search to display all of the results that contain what was keyed into the field. Typing different information into the “From” and “To” sections can be done to create a range, showing all of the fields that fall between that criteria.
To begin a new search, click the black ”Reset” button located at the top of the advanced search window.

Invoice search filtered in different ways
Organizing and Filtering Results
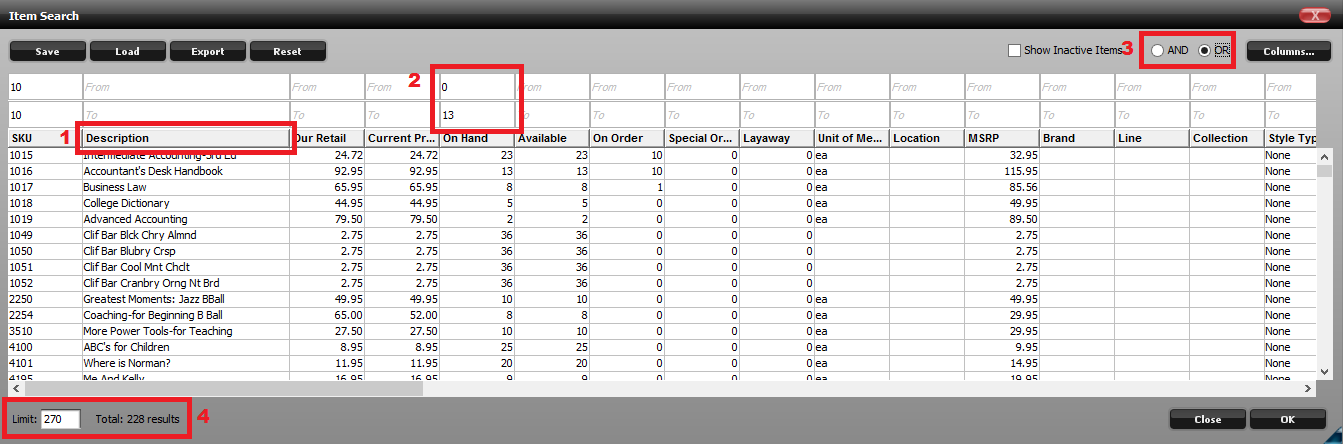
An item search window with a field resized (1), a “From” and “To” range selected (2), set to “OR” (3), and limited to 270 results (4)
When a field is being edited, a question mark icon (?) will appear next to the typing cursor.


Question Mark Search Assistant Window
Clicking that icon will show more ways to filter the information, explained here:
Contains – Will show all results that have the search text inside it
Does Not Contain – Will show all results without the search text within it
Starts With – Will show all results that begin with the search text
Ends With – Will show all results that end with the search text
Is Blank – Will show all results where the result is blank
Is Not Blank – Will show all results where the result is not blank
Between – Will find all results within a range of two inputs
Clicking on the header for each column will sort your results by that column.
▲ – Orders results ascending, lowest to highest, earliest to latest
▼ – Orders results descending, highest to lowest, latest to earliest
Near the top right corner of the advanced search window is a checkbox for “And” as well as “Or” that can be used to further filter information. By default, the And box is enabled, which will show all results where each column’s specific filters are applied. Clicking the Or option will show all results where a filter is applicable, but not specific to all of the filters at the same time.
The columns can all be resized and reordered to show the information more clearly. To resize a column, click on the border with the next cell and drag it to the preferred length. The bar at the bottom can be scrolled to see more columns by either clicking the arrows on either side or by dragging the dark part of the bar to the left or right.
The default limit for any result is 100 lines. This limit can be adjusted or removed by typing into the limit box in the bottom left corner of the advanced search. Changing this number to a 0 will remove the search limit entirely, showing all of the results.
Searching for Styles
When using the advanced search to find items, specific style information can now be found more easily by using the Style Type column. Typing the word “Master” into the search field for Style Type will now display all of the results that are Style Masters. Similarly, searching for “Member” will display any results that are Style Members. If styles need to be excluded from the search, typing “None” into the style type column will show all non-styled results.
These style options also work as a range. By typing “None” in the From setting, and “Master” in the To setting, the advanced search will display all regular items as well as style masters. Conversely, typing “None” in the From setting and “Member” in the To setting will display all regular items and style members as results.
There are six different ways to search styles that will display varied results.

Saving and Loading Search Definitions
If one particular custom search works well enough to be reused frequently, it can be saved for reuse by clicking on the black save button in the upper left corner of the screen. The search can be named, and it can be specified whether the search is available for the current user only, or for all users.
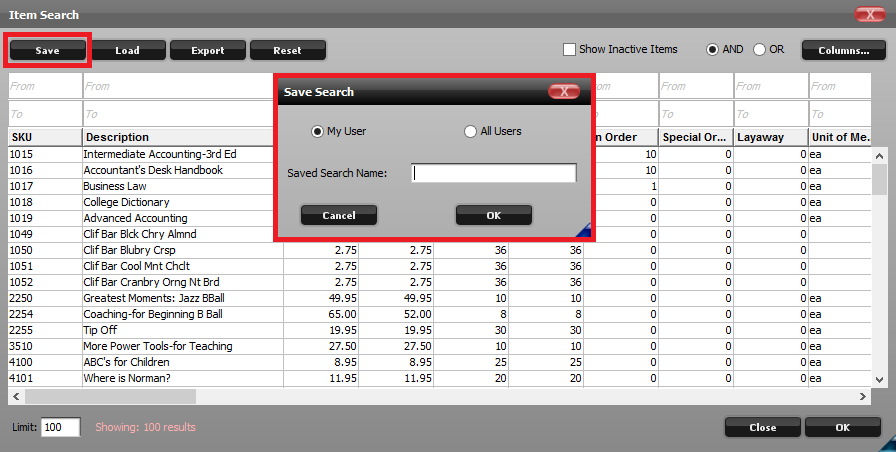
Clicking Save will pull up the Save Search window
Saved searches can be recalled later by clicking the black load button to the right of the save button.
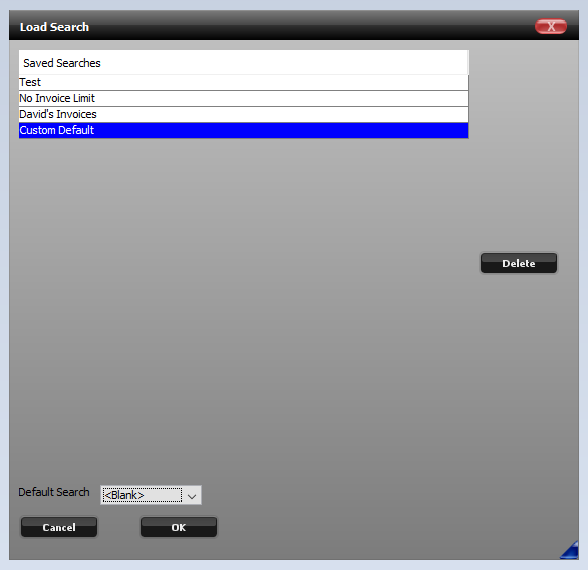
Loading a Saved Search
To load the search, select it from the list and press the OK button at the bottom of the screen. Saved searches can also be deleted by selecting them and pressing the delete button on the right of the load search window.
The default search can also be set by selecting it from the drop-down menu above the OK button and then pressing the OK button to save changes.
Reordering Columns
The order of columns can also be easily changed by clicking on the column’s name and dragging it along the row. To save the column order so that it remains this way when you open advanced search again, press the OK button at the bottom right corner of the screen.
Columns can also be selected and deselected by clicking on the black columns button in the top right corner of the advanced search screen. This will open a separate window where the displayed columns can be adjusted. Un-checking a column name will make that column no longer display in the advanced search menu, although it can be re-checked later through this same screen. If you click on a column name you can drag it up or down the list, and its position in the advanced search will match the new order. Press Save to apply any changes made here. Note that size of columns and which ones are visible are unique to the user who made the changes and are not saved by the Save Search feature.
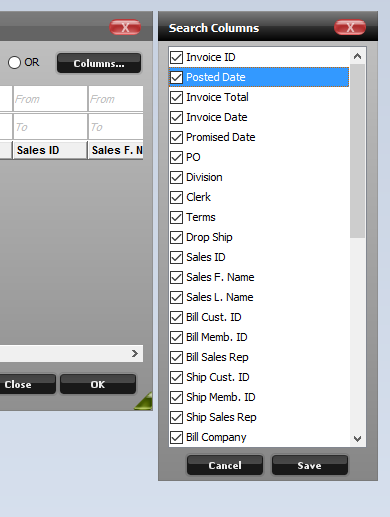
Search Columns are all enabled by default
Exporting Search Results
Searches can be exported into a spreadsheet with the Export button. After the results have been generated with the applied filters, pressing the Export button will open a window to choose where the results are saved. The file exports in the .xlsx format, which is readable by Microsoft Excel as well as most other spreadsheet editors, as well as re-importable via POSIM’s own import manager module.

Use the Export button to export search results directly to .xlsx format
Selecting Results
After the search is completed and the desired item is found, click the line to select it. Selected lines will turn light blue. Multiple lines can be selected by holding the control key (Command Key on Mac:⌘) and clicking the lines separately. To select many subsequent lines, click the top line in the series, hold the shift key, and then click the last line wanted. Finally, to select all of the results at once, press Control+A or (Command ⌘+A on Mac). After all of the desired results are selected, press the Okay button to load them.

Selected lines will turn light blue