Setting Verifone MX915 Credit Card Reader to use Static IP address
This article will cover how to setup a Verifone MX915 device to have a static IP address. On setup, the device’s default connection mode will likely be DHCP, which offers sufficient flexibility and reliability in most cases. If you’re experiencing internet outages or connection issues, however, having the Verifone device set to Static IP can be beneficial. With DHCP the device’s IP address can change in the event of a network drop or power outage. With the device set to use Static IP it will retain the IP address it was given and should be able to connect back to POSIM after the network comes back up.
Steps to configure as static:
- The first step is to obtain the Verifone MX915’s IP address. There are two ways this can be done.
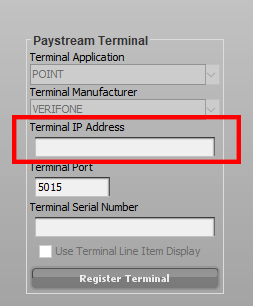
- If the device is already connected through DHCP and is currently processing credit cards without issue, the IP can be found in POSIM under Administration > Computer Preferences > Payment Terminals in the Terminal IP Address box.

- Another way to obtain the IP address would be to quick restart the terminal.
- On the terminal, hold down 1-5-9 simultaneously for about three (3) seconds. When the numbers are released, there should be a message on screen saying “Application Halted.” It should then display a screen prompting for a password. That password is 166832. After typing in the password press the green Enter key on the device’s pin pad.
- Next, there will be three options displayed on screen: Run App, Logout, and Reboot. Select “Run App.”
- About one minute after pressing the button, an IP address will be displayed on the display window. Write this number down.
- If the device is already connected through DHCP and is currently processing credit cards without issue, the IP can be found in POSIM under Administration > Computer Preferences > Payment Terminals in the Terminal IP Address box.
- Now that the IP address has been obtained, the device can be set to Static IP
- Repeat the first two steps of 1b above to enter the MX915’s admin menu.
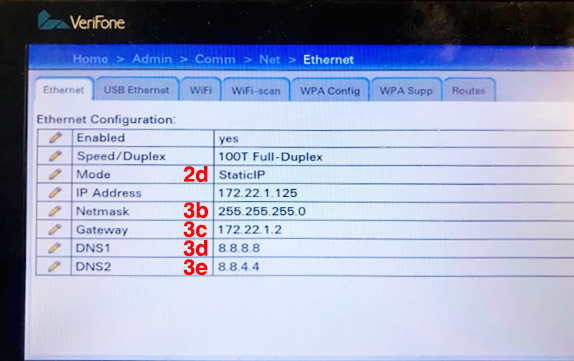
- This time when being prompted to select an option press the tabs on the top in the following order: Administration > Communication > Network > Ethernet
- In the Ethernet tab the addressing information should be displayed.
- Select “Mode” and change from DHCP to StaticIP. This should blank out the addressing fields.

- Entering the Addresses
- In the IP Address field, enter the IP address from Step 1.
- The terminal will want every digit (3 apiece) filled into the fields.
(For example: if the IP address is 192.168.0.50 when entered into the terminal it would be 192.168.000.050).
- The terminal will want every digit (3 apiece) filled into the fields.
- In the Netmask field enter 255.255.255.000
- For the Gateway field, that address can be found on the computer.
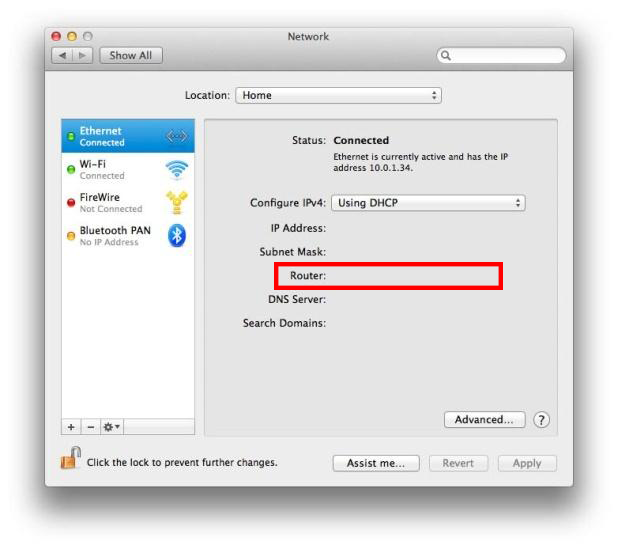
- On a Mac computer go into the Apple Menu > System Preferences > Network. The Gateway will be the Router IP address.

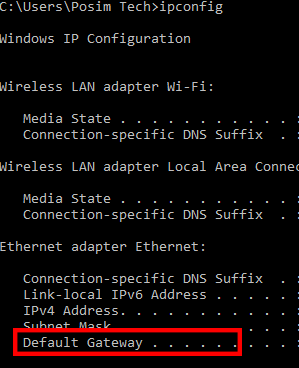
- On a Windows PC open command prompt by going to Start and typing “command prompt” and type in “ipconfig.” The Gateway address should be listed under “Default Gateway.”

- Enter that IP address in the Gateway field on the Verifone.
- On a Mac computer go into the Apple Menu > System Preferences > Network. The Gateway will be the Router IP address.
- In DNS 1 enter: 008.008.008.008
- In DNS 2 enter: 008.008.004.004
- In the IP Address field, enter the IP address from Step 1.
- Finishing Up
- After all the addresses are entered correctly there should be an “Apply” button in the top right corner. Click that button to apply changes.
- When the button disappears click “Home” in the top left corner which will display the three boot options.
- Click “Reboot” this time. Rebooting takes a few minutes longer, but it is necessary to switch from DHCP to StaticIP.
- When the MX915 gets back to the IP screen, verify that the IP address is correct and that the Mode shown below it is StaticIP.
